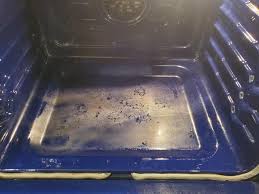
We’ve all been there—you open your oven, and BAM! You’re face-to-face with burnt cheese, grease splatters, and who-knows-what stuck to the bottom. My neighbor used to have one of these and the inside was so nice. She was worried about ruining it one day and gave me a call. I’ll outline the steps we took to clean it safely below.
If you’ve been putting off cleaning your LG oven with that stunning blue interior because it feels overwhelming, don’t worry—you’re not alone. The good news? Cleaning doesn’t have to take hours or leave you frustrated. With the right steps, you can tackle the grime and have your oven looking like new in no time. So grab your favorite cleaning tools, roll up your sleeves, and let’s make this task as simple as possible!
What Makes LG Ovens with Blue Interiors Different?
LG ovens with blue interiors aren’t just pretty—they’re designed to be easier to clean. The smooth blue coating makes it harder for food and grease to stick. Plus, the bright color helps you see messes more easily, so you know where to clean.
But this shiny surface needs a gentle touch. You should avoid using harsh scrubbers or strong chemicals, as they can scratch or dull the finish. Stick to soft sponges, cloths, and mild cleaners. If you’re dealing with tough grime, natural options like baking soda and vinegar are safe and effective.
Another great feature is the EasyClean mode. It uses water and low heat to loosen up spills, making them easy to wipe away. It’s perfect for quick cleanups without a lot of effort. By knowing how to care for your oven, you’ll keep it looking great and make cleaning simple!

Step 1: Know Your LG Oven’s Features – The EasyClean Mode Might Be All You Need
Before you jump into scrubbing, it’s important to understand what makes your LG oven with a blue interior unique. The vibrant blue enamel isn’t just for looks—it’s designed to be durable and easy to clean, but only if you treat it right. Using the wrong cleaners or tools can damage the finish, so knowing what works best is key.
Many LG ovens come with special cleaning modes like EasyClean or Self-Clean, which can do a lot of the work for you. The EasyClean mode is perfect for everyday messes—it uses low heat and water to loosen grime so you can wipe it away effortlessly. The Self-Clean mode, on the other hand, is great for tackling heavy-duty build-up but requires a bit more preparation.
Step 2: Gather Your Cleaning Supplies
Before diving into cleaning, take a minute to grab everything you’ll need. The good news? You probably already have most of it at home! For everyday messes, all you need is:
- A soft microfiber cloth or non-abrasive sponge
- Dish soap or a mild cleaner
- A small bowl of water
- Optional: Baking soda, vinegar, or a store-bought oven cleaner for tougher stains
Step 3: Choose Your Cleaning Method
When it comes to cleaning your LG oven, you’ve got options! Here’s a breakdown of the three main methods:
1. EasyClean Mode (Best for Everyday Messes)
This mode is great for light spills. Add about a cup of water to the bottom of your oven, close the door, and activate the EasyClean feature. In 10–20 minutes, the heat and steam will loosen grime so you can wipe it away with a damp cloth.
2. Self-Clean Mode (For Heavy Build-Up)
The Self-Clean mode is perfect for tougher messes. It uses high heat to burn off food and grease, turning them into ash. After the cycle, let the oven cool, then wipe away the ash with a soft cloth. Just make sure your kitchen is ventilated, as this process can produce some smoke and smells.
3. Manual Cleaning (For a DIY Touch)
If you prefer a hands-on approach, mix a baking soda paste with water and apply it to stuck-on grime. Let it sit for 15–30 minutes, then gently scrub with a sponge. For greasy spots, use a vinegar-water mix to cut through the mess.
Each method works well depending on the level of mess. Pick the one that fits your oven’s needs!
Step 4: Don’t Forget the Glass Door
The glass door is often overlooked, but it’s one of the first things you see when your oven is in use. Luckily, cleaning it is easy and doesn’t take much time.
For a streak-free shine, start with a simple mix of vinegar and water. Spray the solution directly onto the glass, then wipe it down with a microfiber cloth or paper towel. If the grime is stubborn, sprinkle a little baking soda onto the glass and add a few drops of water to make a paste. Let it sit for about 10 minutes, then scrub gently with a soft sponge.
Make sure to clean both the inside and outside of the door. The inside can get covered in grease and baked-on residue, while fingerprints and smudges often build up on the outside. For the finishing touch, buff the glass with a dry cloth to remove any streaks or residue.
A clean glass door makes a big difference, letting you see your food as it cooks and making your oven look fresh and polished!
Step 5: Finishing Touches & Preserving that Blue Finish
You’re almost done! After cleaning the inside and glass door, give your oven one final wipe-down. Use a damp cloth to remove any remaining cleaner or grime, then dry everything with a soft towel to prevent water spots.
Don’t forget to check the racks! If they’re removable, take them out and clean them in the sink with warm soapy water. Scrub gently with a sponge, rinse, and dry before putting them back in.
To keep your oven looking great between cleanings, try placing a baking sheet on the bottom rack when cooking messy dishes. This simple trick catches drips and spills, so they don’t end up baked onto your oven floor.
Lastly, consider using an oven polish to help preserve that blue interior and make it shine! I always use something like Merrychef or William’s polish.
With everything clean and put back together, your LG oven is ready to use again. Whether you’re baking cookies or roasting dinner, you can enjoy a fresh, spotless space that’s ready to handle any recipe. Keeping up with regular cleaning will make future messes easier to manage, so you spend less time scrubbing and more time enjoying your meals!

